


In this article, I’m going to teach you exactly how to index your content on Google faster using the Google API. We will do this through an Instant Indexing plug-in and other things that I will list in a very short time. This guide is built for WordPress but you can use it on other CMSs as well, only the last part of the tutorial will change.
This API insertion process is a bit complex, but when it comes to your website’s content ranking and SEO it’s good to spend some time on it because it will only help you in the future.
You have two options or watch this video below made by me where I show you the whole process, or read the next few paragraphs.
What is Instant Indexing
Instant indexing is precisely the instantaneous indexing of content that is done by having the website communicate directly with the APIs that will immediately pass it to the search console (you can find a guide on the search console here if you need to better understand how it works).
Basically between the search console and the site there will be a third party (the APIs) communicating the updates that happened on wordpress directly to Google.
Why what and how will instant indexing help?
Most importantly, instant indexing indexes and ranks content faster.
Because it uses Google’s search indexing API to submit content directly to the search engine, this makes your content visible on the SERP faster than traditional Sitemap submission. Especially important for content where the time factor matters a great deal, such as news updates or topical blogs
What will we need to make the link?
We will need four things:
1.Google Cloud Platform
2.Search Console
3.Rank Math SEO
4.Instant Indexing (a plugin we’ll see in a moment)
How to connect Google APIs for instant indexing to WordPress.
Well let’s start to see how to do it.
1.Now click on My First project at the top
2.Then click on new project and enter the name of your site or project. You could also leave the location blank.
3.Now select it from the top and enter the project.
4.Let’s go to the menu on the left and then to “APIs and Services” after that “Library” and in the search field type in “Indexing APIs,” select it and click on Enable, you will get the related screen.
5.Click on “Credentials” and then “Create Credentials” Service account.
6.Give it a name to your liking and also a description so you can remember it “Example Instant Index Service”
7.Assign it the owner role
8.The system will recognize an email for you, copy it
9.Go to Search Console and at the bottom left go to Settings
10.Now go to Users and Authorization and click “Add User.”
11.Paste the previously copied email and give it “Owner” authorization, give add
12.Go back to Google Cloud Platform and click on the 3 dots on the email and then on “Manage Keys” (See picture below)
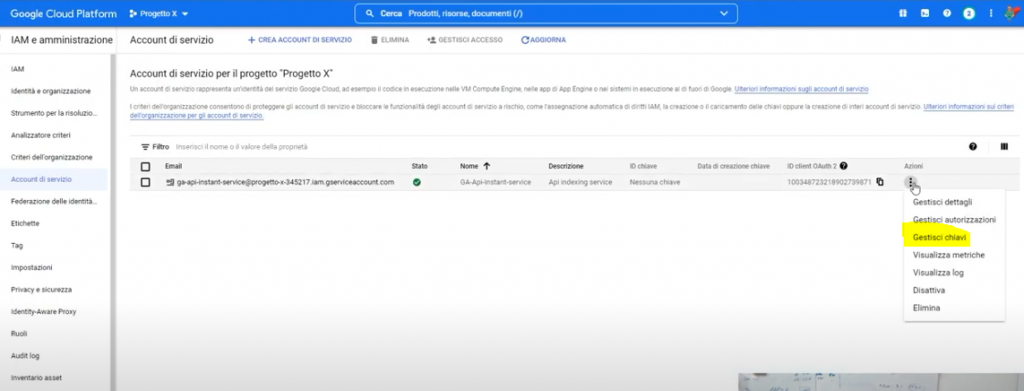
- Add key
- Create new Key and select Json and click create. It will download a json file for you
Well now let’s go inside wordpress, we are almost done - Install Rank Math SEO if you haven’t installed it yet and go through the whole installation procedure to configure it
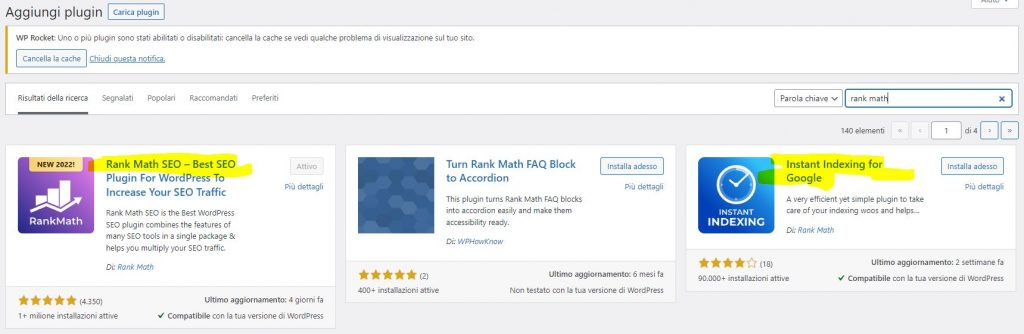
- Install Instant indexing, the plugin (see image above) or download it from here
Instant Indexing for Google
Activate it
- Open the plugin will be in the rank math menu in the “Instant Indexing” section
- Go to the “Google Api Setting” section and load the Json in by doing browse. Alternatively to make it cleaner you can open with notepad or notepad the file and copy the contents of the json to paste it there in the specific text field.
- Now in the Submit section decide what to bring in with the API (e.g. Articles, pages etc etc), then make save changes.
- You are done now everything will work, but if you want to give it a try, take an article that has not been indexed yet and put it in the field in the console tab and give Send to Api, if it comes out “Success” everything will have gone well.
If you enjoyed the guide, please sign up for our Newsletter to always receive these bombshells in your email box and first of all.


Your comment is awaiting moderation.
Use 1XBET promo code: 1XTAX200 for VIP bonus up to €1950 + 150 free spins on casino and 100% up to €130 to bet on sports. Register on the 1xbet platform and get a chance to earn even more Rupees using bonus offers and special bonus code from 1xbet. Make sports bets, virtual sports or play at the casino. Join 1Xbet and claim your welcome bonus using the latest 1Xbet promo codes. Check below list of 1Xbet signup bonuses, promotions and product reviews for sportsbook, casino, poker and games sections. To claim any of the 1Xbet welcome bonuses listed in above table we recommend using the 1Xbet bonus code at registration of your account. New customers will get a €130 exclusive bonus (International users) when registering using the 1Xbet promo code listed above. 1Xbet Sportsbook section is the main place where users hang out, with over 1000 sporting events to bet each day. There are multiple choices to go for, and the betting markets, for example for soccer matches, can even pass 300 in number, and that is available for both pre-match and live betting, which is impressive and puts it right next to the big names in the industry.
The 1xBet promo code: 1XTAX200. Enter code for registration and receive a 100% bonus up to €100 for free sports bets. This offer is valid for new players. Enter our bonus code for 1XBET in the registration form and claim exclusive bonuses for casino and sports betting.
[url=https://www.modern-constructions.org/blogs/173242/1xBet-Promo-Code-Get-100-Free-Bet-Bonus]1xbet promo code saudi arabia[/url]
Your comment is awaiting moderation.
http://pirat.iboards.ru/viewtopic.php?f=18&t=34720
Your comment is awaiting moderation.
https://portugues.ru/forum/picturecomment.php?do=message
Your comment is awaiting moderation.
https://freekashmir.mn.co/posts/82544200?utm_source=manual
Your comment is awaiting moderation.
https://www.nasseej.net/blogs/225803/Code-promo-1xBet-Tunisie-Bonus-100-jusqu-%C3%A0-400-TND
Your comment is awaiting moderation.
https://webyourself.eu/blogs/1036010/Code-Promo-1xBet-Qu%C3%A9bec-150-CAD-bonus